SolarEdge 18x8B Error: DC Isolation Fault (Riso Low)
Diagnose SolarEdge error 18x8B (isolation fault).
The inverter isolation monitoring interrupter (Riso) detected DC leakage current to ground exceeding safety thresholds, preventing grid export to stop electric shock risks.
Probable Causes
Damaged DC cable insulation pinched beneath rooftop solar mounting rails.
Water ingress inside rooftop DC MC4 junction connectors or combiner box.
Cracked optimizer backplate allowing moisture penetration during morning dew or rain.
Diagnostic & Testing Steps
- •Inverter red LED illuminated, blue status light extinguished, error 18x8B on SetApp.
- •Zero AC wattage exported to breaker panel during bright sunlight.
- •System attempts isolation self-test every 5 minutes and trips immediately.
Tools & Equipment Required
- ✓CAT III 1000V Digital MultimeterTest SafeDC output voltage (1.0 VDC per paired power optimizer in standby mode).
- ✓MC4 Solar Connector Disconnect ToolSafely unplug DC optimizer string leads at the safety switch module.
- ✓Class 0 1000V Insulated GlovesRequired protective equipment when servicing rooftop DC string wiring.
- ✓Torx T20 ScrewdriverAccess internal connection unit and check communication board ribbon cables.
- ✓Inspection FlashlightInspect module-level optimizer status LEDs underneath rooftop PV panels.
Fast Reset Sequence: Solar Inverter Safe AC/DC Shutdown & Reboot Sequence
Before unmounting panels or beginning diagnostic procedures, attempt this manufacturer reset to clear transient microcomputer lockouts:
- 1.Step 1: Switch OFF the dedicated AC circuit breaker at the main electrical distribution panel.
- 2.Step 2: Turn the rotary DC Disconnect Switch on the underside of the inverter to the OFF (0) position.
- 3.Step 3: Wait a minimum of 5 to 10 minutes to allow high-voltage DC capacitors to bleed down to 0V.
- 4.Step 4: Re-engage the DC disconnect first, followed by switching ON the AC breaker.
- 1
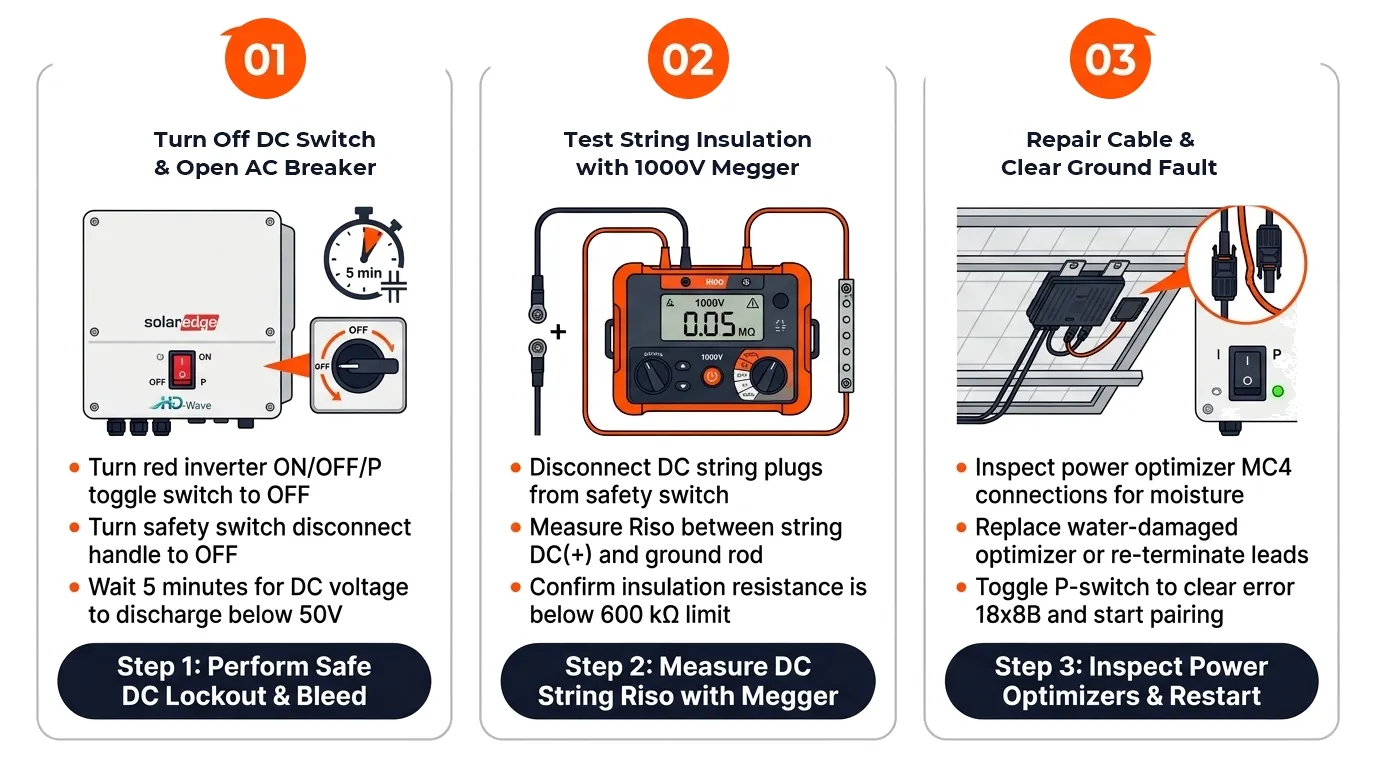
Step 1: Turn Off DC Safety Switch and Open AC Breaker
[ ] DoneRotate red DC disconnect switch to OFF position and flip dedicated solar AC breaker to de-energize grid interface.
Verification:Inverter enters safe shutdown mode; verify 0 VAC at AC terminal block. - 2
Step 2: Test DC String Insulation with 1000V Megohmmeter
[ ] DoneDisconnect DC strings from inverter terminals. Connect Megger positive probe to string cable and negative probe to equipment ground bar.
Verification:Reading must exceed 600 kΩ (typically > 20 MΩ on dry undamaged arrays). Low readings pinpoint damaged string. - 3
Step 3: Repair Compromised Cable and Reset System
[ ] DoneLocate moisture damaged connector, replace with genuine MC4 connector, re-seat DC terminals, and power up inverter.
Verification:Inverter self-test completes Riso check successfully and transitions to active production.
Repair Solutions
Perform Megohmmeter insulation resistance test on disconnected positive and negative DC string leads to earth ground.
Inspect roof array cables for mechanical chaffing against sharp metal tile brackets.
Isolate faulty string or optimizer pair using SetApp diagnostic telemetry.
Frequently Asked Questions
Why does error 18x8B occur mostly in the early morning?
High morning humidity and dew condense inside cracked connectors, lowering insulation resistance. As midday sun dries the connector, the fault may temporarily clear.
Can a defective SolarEdge optimizer cause error 18x8B?
Yes. An internal short between the power optimizer circuit board and its aluminum mounting bracket will ground the entire DC string.